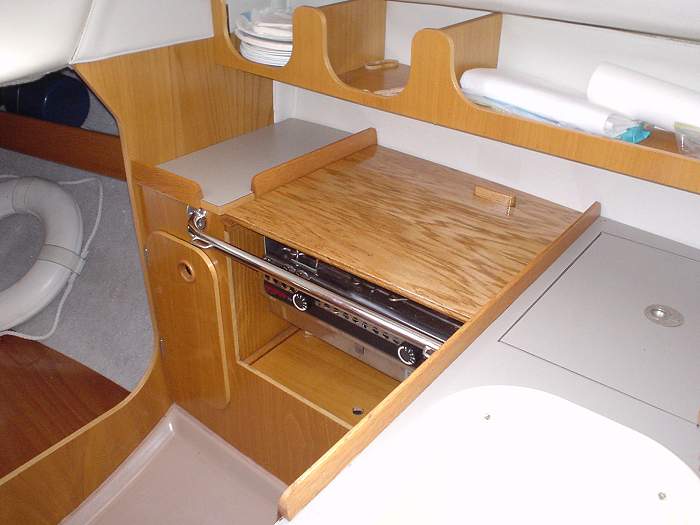
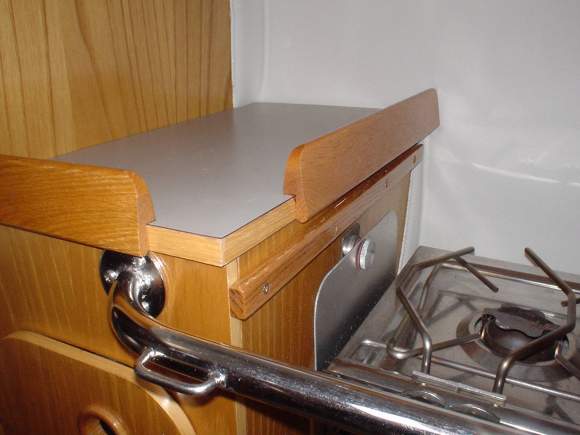
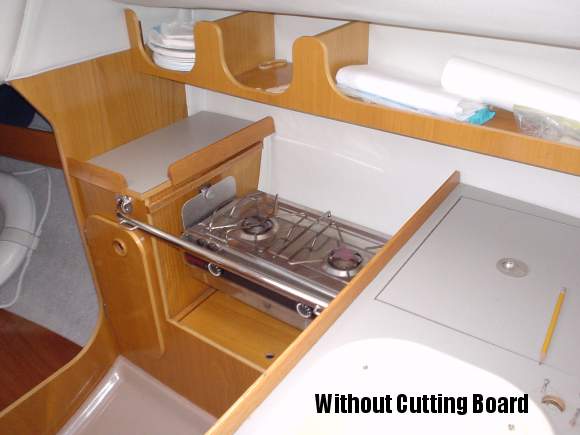
This handy mod for your F235 converts the
open space above the Origo Model 3000 stove into additional countertop.
It features an easy slide-in-place design and a removable cutting
board. The cook will like it. With this mod you may no longer
have to press the salon table into service for food preparation.
Materials:
•
1 ea 19 1/8" x 17 1/4" x 1/2 (or 5/8") birch/oak
plywood Grade AA
(both sides finished) carefully cut from
a 20" square panel as described in the text.
• 1 oak
left table lip 1 1/8" x 1/2" x 16 1/2"
• 1 oak right table lip 1 1/8" x 1/2" x 15 1/2"
• 2 ea oak support rails 15 1/2" long x 3/4" thick
and tapered 3/8" to 5/8"
• 1 each 1" x 3" x 3/4" piece of scrap oak/wood
of choice
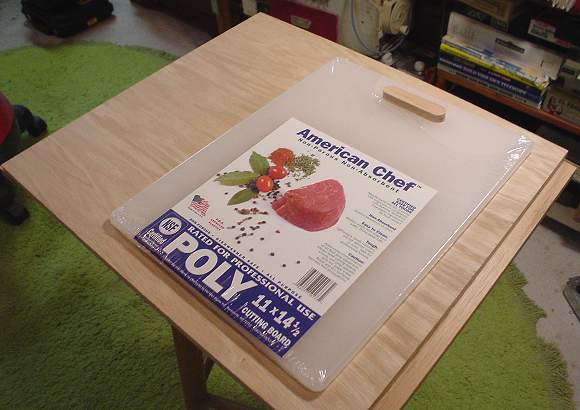
• 1 ea 11" x 14 1/2" "American Chef
Non
Porous Non-Absorbent" poly cutting board (Wal-Mart, about
$6)
• Handful
of 3/4" #4 stainless steel or brass FHWS
• Stain and marine finish of your choice.
Overview
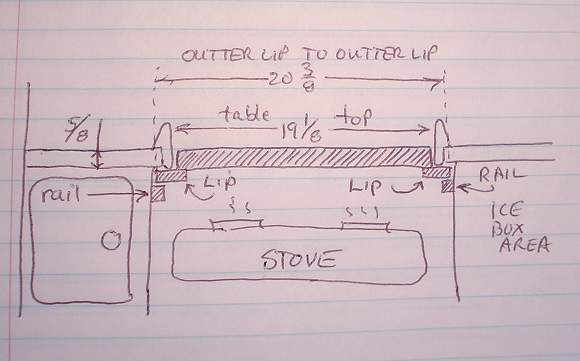
The diagram shows a front cross section of the table and how it
sits in relationship to the fixed cabinet and moldings (and yes,
I know I spelled "outer" wrong - hey it's just a shop
sketch). The new tabletop has two lips underneath, one on each
side. These lips ride on top of two rails which are screwed to
the existing cabinetry. This arrangement forms a track that the
countertop slides into. The table is installed by resting it on
top the chrome grab rail, and then sliding it into the track until
it touches the hull liner behind the stove.
Although all of the measurements are
accurate for Windependent you should verify that the measurements
are valid for your boat, or make new ones and change the plans
accordingly.
Countertop Construction
Start by cutting out the countertop.
Measure the width of the new countertop, which is the inside edge
of the left molding to the inside edge of the right side molding
(19 1/8"). Using a 20" x 20" panel, and with the
grain running from left to right across the length of the stove,
cut the panel to the proper width. The panel is now the right
width, but it is still too deep.
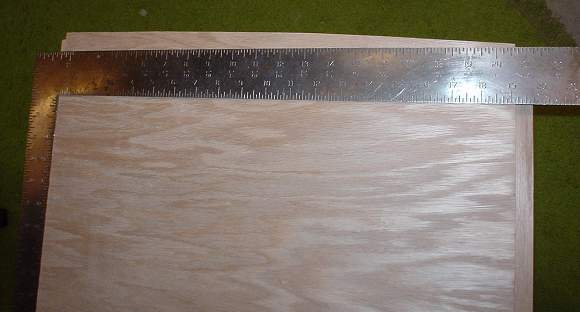
Remove the lid from the storage compartment
under the stove, square it up on the rear of your cut panel, and
use it as a template to trace the hull curve across the back edge.
This will insure a nice fit when the table is inserted. The picture
shows a carpenter square on the countertop panel after the curve
has been cut to give you an idea of what it should look like.
I used a band saw to cut the curve.
Now that you have the back edge properly
curved, hold the countertop in place between the two moldings.
You should have a little side-to-side play to account for temperature
and humidity induced changes. 1/8" is plenty, any more tends
to look like a gap or sloppy workmanship. Trim the width a little
if necessary.
Hold the new countertop in place, and push
it back flush to the hull liner. Carefully mark the depth needed
by using the left front cabinet tabletop edge as a guide. The
result will be to make the new countertop the same depth as the
countertops on the rest of the cabinetry - so they all match and
look nice. I needed about 17 1/4".
Carry the 17 1/4" mark across the front
of the panel, thus defining its front edge. Use a carpenter's
square to make sure it is 90 degrees with respect to the panel's
left edge. Recheck your measurements and fit, and if to your liking,
cut the panel to its final size.
Lips
The lips are the same size in cross section, but the left lip
is longer than the right lip. This is because the right hand edge
of the panel is shorter than the left on account of the curve
across the back. Make two lips using the dimensions in the materials
list.
You can put a length of oak strip veneer
on the exposed front edges if you like. As a minimum you should
fill any plywood voids that show. It is best to finish sand the
countertop panel now, before the lips are attached in the next
step.
Measure the distance from the left
cabinet wall to the right cabinet wall, just beneath the molding
(see sketch). The "outer lip to outer lip" measurement
must be a little less so the countertop slides freely in and out.
My measurement was 20 3/8". To achieve the required finished
size of 20 3/8" the lips had to overhang each side by 5/8"
on mine. Make sure you attach the lips to the underside of the
panel! Attach the lips to the underside of the countertop and
flush with the front edge using a good quality water resistant
wood glue (Titebond II Premium Wood Glue is good). After the glue
has dried, screw the lips to the top panel from the underside,
countersinking them flush. Don't use screws that are too long!
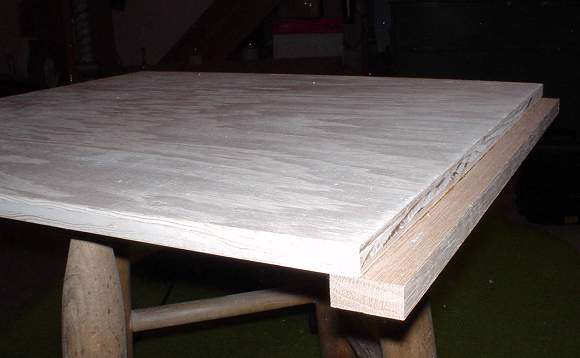
Putting the lips underneath like this raises the top surface so
it doesn't look so much lower than the rest of the countertops
in the galley.
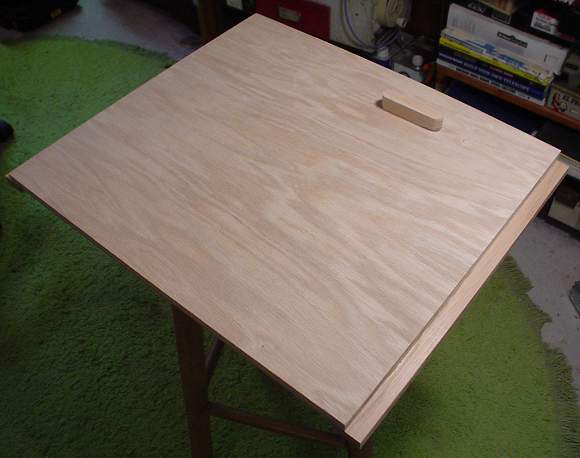
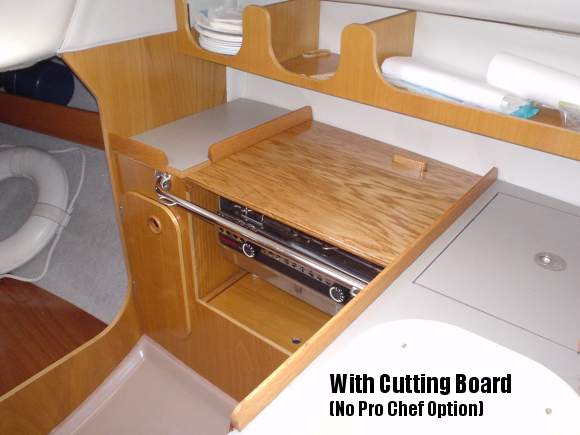
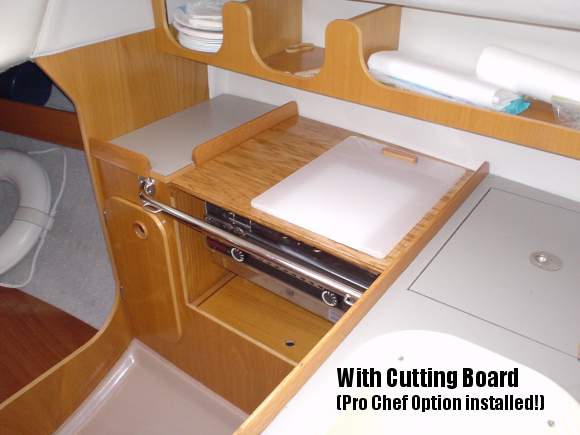
Cutting Board
The specified cutting board has an oval handhold in one end. Trace
that oval shape onto the 1" x 3" x 3/4" oak scrap
and cut out the wood shape. The oval should be 3/4" thick.
This wood shape will attached to the panel near the rear, and
the cutting board will lie in place over top of it. This makes
it easy to remove and clean and also keeps it from sliding around.
Position the wood plug where you like, and
glue it down. When the glue is dry, add screws from the underside.
Here's the cutting board and the finished
wood plug shown in position.
Thank goodness the cutting board is "Rated
for Professional Use". On Windependent I would not have it
any other way.
When it's removed the entire surface becomes
plain countertop.
A lid-less plastic tub, or a small wash bucket with an oval cut
out of its bottom can be positioned over the wood oval when you
are not using the cutting board. It serves as a handy place to
store small odds and ends while sailing - yeah, INSTEAD OF USING
THE SINK. The wood oval protruding through the bottom of the container
keeps it from sliding off when sailing.
Rails
Now the rails must be fashioned for the left and right sides.
These will screw into the existing cabinetry and hold up the sliding
countertop. I was surprised to find that on my boat the rails
needed to be wider on the end closest the hull liner. This was
the case on both the right and left sides. It is necessary to
taper the rails so that the lips have a constant width to glide
on as the countertop is slid into position. Otherwise, the rear
of the table could fall down, the rails being too far apart.
Looking from the front, the rails should
be 3/4" tall. This gives sufficient room for solidly screwing
it to the cabinet, and also clears the gimbal mount of my stove.
Check your situation.
I required 3/8" wide at the front and
5/8" at the rear for my rails, and this was true of both
the left and right rails. Measure the necessary length of the
left and right rails. I found 15 1/2" worked for both. Plan
them so they are flush with the front of the cabinet face. Cut
them to length before you taper them.
You can cut tapers at least two different
ways. You can start with 5/8" wide rectangles and taper them
with a wood plane. Or instead you can use a taper jig used for
cutting tapered table legs. I used the latter.
Mark the position of the rails on the cabinetry,
making sure you allow about 3/32" vertical clearance between
the underside of the Beneteau moldings and the upper side of the
rail. It you don't have enough clearance the countertop will jam.
When you have it just right, drill small pilot holes through the
rail and into the cabinetry. Finish the rails before you mount
them permanently.
Finishing
Final sand the new countertop and slightly bevel the edges along
the outer lip edges where they will ride on the rails. Slightly
bevel the outer rail edges, too. Don't bevel the edges of the
rail that mount to the cabinetry.
Apply a coat of stain of your choice and
let that dry overnight. My topcoats consisted of several coats
of Minwax Helmsman Gloss varnish to match my salon table and cockpit
table that I finished similarly. It would also look great with
an 8" inlaid compass rose. Of course, you could paint the
countertop or even Formica it to match if you don't care for stain.
Installation
Rough up the finish a little on the cabinetry where the rails
go, apply some glue and screw the rails into place. Rest the countertop
on top the chrome handrail in front of the stove. Catch the lips
in the track above the rails, shove it all the way back and take
a pretty picture.
Use
Of course, you MUST remove the countertop prior to using the stove
or you will quickly burn to the waterline. Aside from that, the
countertop can be either installed or not, and used with or without
the cutting board. A couple of discrete cup hooks on the underside
of the countertop may allow you to hang it from the D-rings on
the chrome handrail. If you tend to dump your countertop when
heeling hard to starboard, a small wooden toggle on the left cabinet
can be installed to hold the left lip of the countertop captive.
A similar wood toggle on top the oval wood plug would keep the
cutting board (or a little wash bucket for junk) in place no matter
what.

return to
Beneteau First 235 Mods Online