|
Beneteau
F235 Cockpit Table
By Mike Hayden, Sophie, & Windependent |
|
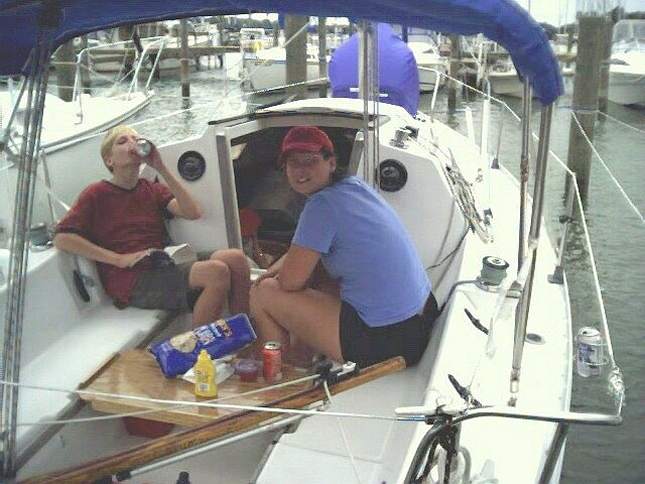
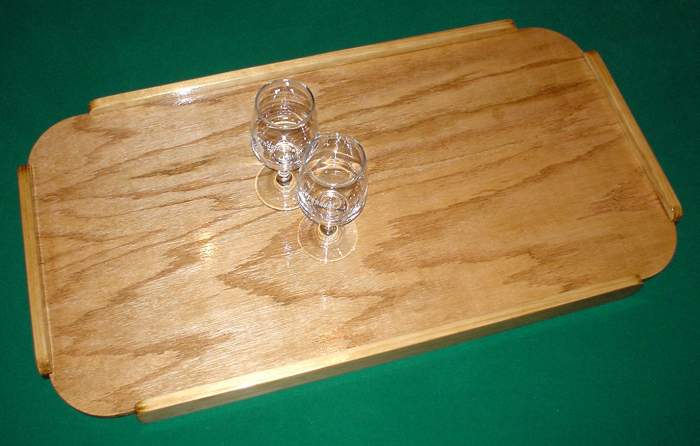
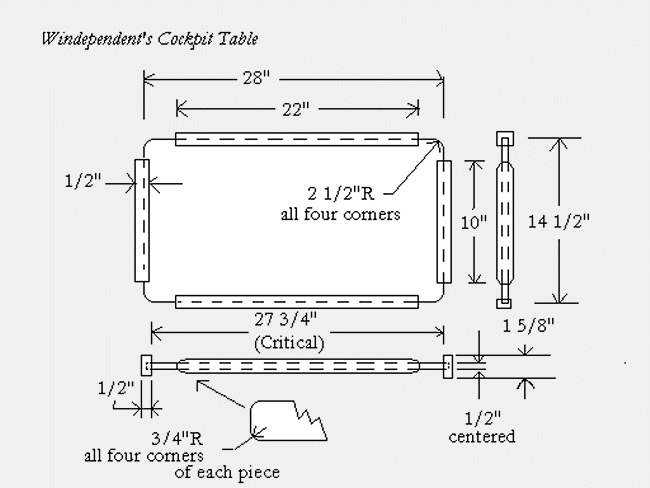
You can place the table in a few different places fore or aft along the cockpit as long as you make the short side railings of the table the right length. Mine were perfect at 10". The lower lips of the railings keep the table in place, and the upper lips of the railings keep your goodies in place. The form of the cockpit table was designed to complement the salon table. It's easy to put in place and take off (no fasteners of any type), and it stows flat since it is only 1 5/8" thick. It's great for happy hour and dining out in the cockpit. Construction Notes: Table surface is 1/2" grade A-A oak veneered plywood 28" x 14 1/2" (1 ea). I had to buy a 48" x 48" sheet of it to get the 28". That's OK, more wood for other projects, right? Railings are solid red or white oak
and
Table corners have corner radii of
2 1/2" (try a 2 lb coffee can bottom)
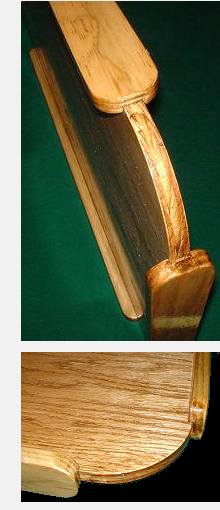
If you measure too small, one side of the table will fit in the gap, but the other side will hit the wooden cockpit trim. If you measure too big, one side will fit in but the other side will hit fiberglass. If your measurement is just right, each side will drop into its gap and the table will be held captive. On Windependent, this measurement is 27 3/4". If your measurement is 27 3/4", and the tabletop length is cut to exactly 28", the difference between the two is 1/4". You need a dado in each railing sufficient to accept the tabletop. You need two dados (one in each railing) and you have to "use up" 1/4" total, or 1/8" on each. So cut each dado 1/8" deep. Understand the reasoning in this paragraph before proceeding! If your measurement isn't 27 3/4", re-compute the dado depth calculation and use your results instead of mine Remember the old adage: Measure twice, cut once. Make the width of the dado sufficient to snuggly accept the 1/2" table top, and cut the dados in the short railing to the required depth, centering the cut along the width of the railing. This operation makes the upper lip same as the lower lip. The dado depth of the long railings is not as critical, but for esthetics use the same depth, and dado them right down the middle, too, so the upper lip is the same size as the lower lip. Precise work here will keep the railings at nice right angles to the tabletop when you glue things up later. Cut the radius curves on the tabletop and the railings. I used a band saw and cleaned up the curves on a disk sander. If cutting the radius corners on the tabletop reveals any laminate voids in the plywood edge, fill them now with stainable wood filler if they will show. For what I had to give for the plywood I was not expecting voids and I didn't have any. Now sand all parts carefully. Many a job is ruined at this point by inadequate surface preparation. Imperfections are hard to see, until of course, you apply stain and then it is too late. Examine your surface prep work carefully, looking at each piece from various directions and with different light angles. Final sand your work by hand with a rubber block and 400 grit sandpaper. If you are a fanatic, move on to 0000 steel wool.
Remove ALL residue and dust. Finish with a coat of wood stain of your choice (I used Minwax Wood Finish, Puritan Pine 218). Let the stained wood dry a day or two, then apply a marine grade finish (I like Minwax "Helmsman" Spar Urethane, Clear Gloss). I want it to last, so I applied 6 coats over a period of a week. I know. It is overkill. Now, sail somewhere nice. With your
sails properly flaked and your lines Flemished, set your table
out in the cockpit in sufficient time for it to catch the golden
rays of the setting Sun. Place upon it an on open bottle of Merlot
and a little sharp cheddar. You will not regret the time you spent
building it.
|
 On
your boat, lay a yardstick athwart ship, like a bridge over the
cockpit floor, and measure the minimum distance needed that will
allow the table's 1/2" railing lips to fit between the wooden
cockpit trim and the fiberglass on each side. The available gap
on each side is about 3/4". You want the table railing lips
to drop into these gaps freely without scuffing or binding.
On
your boat, lay a yardstick athwart ship, like a bridge over the
cockpit floor, and measure the minimum distance needed that will
allow the table's 1/2" railing lips to fit between the wooden
cockpit trim and the fiberglass on each side. The available gap
on each side is about 3/4". You want the table railing lips
to drop into these gaps freely without scuffing or binding. Glue
everything together, centering all parts. Use high quality water
resistant glue. Clean up any glue that oozes from your joints
before it dries. Glue will show because it won't stain. Then let
things dry overnight.
Glue
everything together, centering all parts. Use high quality water
resistant glue. Clean up any glue that oozes from your joints
before it dries. Glue will show because it won't stain. Then let
things dry overnight.